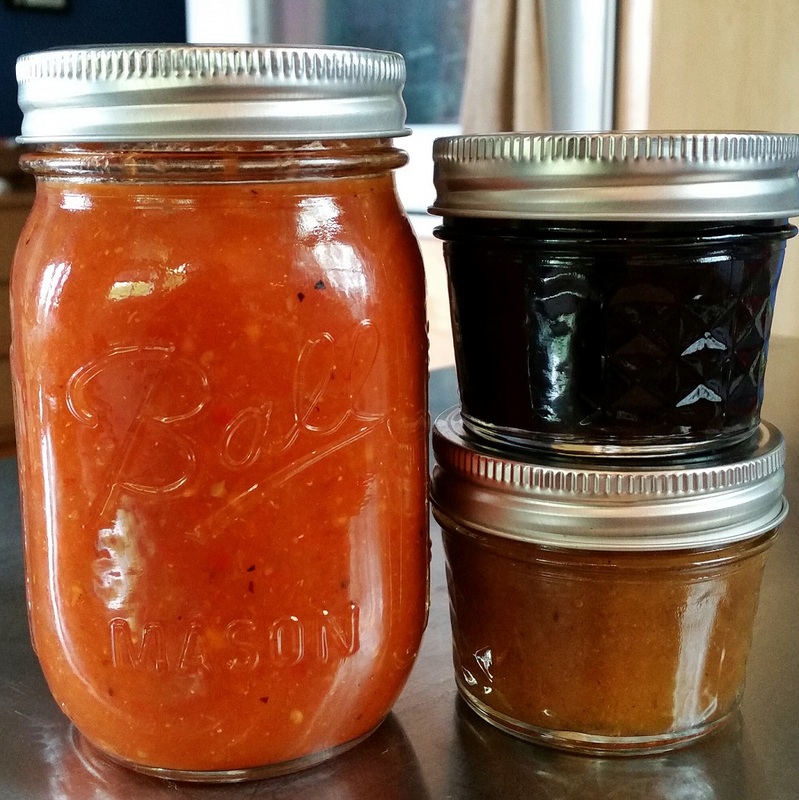
The last gasp of summer farmers' market vegetables are hanging on to the few warm days we have left, and the fall harvest is in full force. I cringe to think of what the Chicago winter will bring us soon, and I've been feverishly canning all the fruits and vegetables to preserve the dog days of summer.
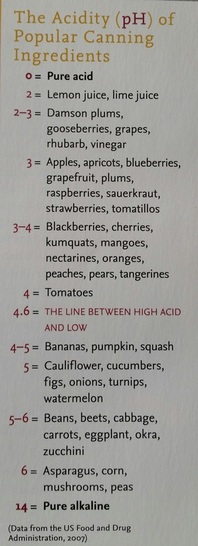 A spiffy chart from the book "Tart and Sweet" that shows acidity levels of some common fruits and veggies...
 The initial idea of canning, while it seemed a romantic throwback to preserving the farm harvest, was quite intimidating. There was the great unknown of what is involved in the canning process, and thoughts of killing my family and friends with botulism over improperly canned jams and jellies ran through my mind. I had a close friend that confidently reassured me that canning is simple, approachable, and very safe as long as you know a few ground rules:
1. HIGH-ACID FOODS ARE EASIER TO CAN
When canning at home, it's easiest to stick to canning foods that have a higher acidity (pH level of 4.6 or lower) because acid is a natural sterilizer, keeping enzymes, mold, bacteria and yeast from spoiling your food.
1. HIGH-ACID FOODS ARE EASIER TO CAN
When canning at home, it's easiest to stick to canning foods that have a higher acidity (pH level of 4.6 or lower) because acid is a natural sterilizer, keeping enzymes, mold, bacteria and yeast from spoiling your food.
2. INVEST IN THE RIGHT GEAR
Canning isn't rocket science, and you really don't need all the techie canning gadgets to get started. Here's a list of the six basic essentials for boiling water bath canning:
Canning isn't rocket science, and you really don't need all the techie canning gadgets to get started. Here's a list of the six basic essentials for boiling water bath canning:
- A large pot for boiling the empty jars, preheating the lids, and processing the filled jars. The pot needs to be deep enough to full submerge the empty and filled jars under water.
- Clean kitchen towels to place on the bottom of the large pot so that jars do not directly touch the bottom of the pot when boiling and to wipe the rims of unsealed jars.
- Canning jars that are specifically made for canning - like Ball, Kerr, or Mason. Do not use old mayo, pickle, or sauce jars! Canning jars consist of three pieces: the glass jar, the metal disc lid, and the metal screw band. The glass jar and the metal screw band can be reused, but the disc lids are a one-time use because the rubber sealant on the edges will only properly seal once.
- A magnetic wand that helps to retrieve the hot metal lids when they're preheated and submerged in the hot water.
- A jar lifter or really sturdy tongs to lift and lower jars into the boiling water bath.
- A ladle to pour food into the jars. Having a funnel to help neatly pour food in jars is nice, but not absolutely necessary.
3. KNOW WHAT YOU CAN AND CAN'T TWEAK IN A RECIPE
It's always fun to get creative and tweak canning foods to add your own flair, but there are some things that you should never deviate from a recipe.
Things can you can tweak:
Never tweak the following:
4. IT'S OKAY IF THE JAR DOESN'T SEAL
If for some reason a jar doesn't seal while processing in the boiling water bath, it's okay! You can still enjoy unsealed jars as long as you store them in the refrigerator. Just don't store those unsealed jars at room temperature with the other sealed jars.
It's always fun to get creative and tweak canning foods to add your own flair, but there are some things that you should never deviate from a recipe.
Things can you can tweak:
- Adding more or less sugar will not hurt the safety of the food. Sugar is added for flavor and setting the shape of the food. For jams and fruit spreads, if you don't add enough sugar, the result may sometimes come out runny. This can be fixed by increasing the cooking time or adding more pectin.
- You can add more or less salt based on your taste preferences. The only major exception to this rule is when you're making fermented pickles - were the salt is actually used to preserve the food.
- You can substitute one pepper for another type of pepper when making salsa. Just make sure that you don't increase the total amount of peppers used.
- Depending on what flavor you want, you can substitute bottle lime or lemon juice for vinegar. Fresh juice can differ in acidity from bottled juice, so keep to bottled if the recipe calls for bottled juice.
- Play with herbs and spices all you want! They don't affect the pH level.
- Substituting one kind of vinegar for another is okay as long as they have an acidity level of 5%. You can check this on the bottle labels.
- Honey can be used in place of sugar, but the conversion is not cup-for-cup. Honey is much more dense and is sweeter than sugar.
Never tweak the following:
- Increasing the amount of vegetablesin a recipe can dangerously lower the pH level in a recipe.
- Never decrease the level of acid in a recipe - lime juice, lemon juice, or vinegar.
- Do not substitute vinegar for bottled lemon or lime juice. Lemon and lime juice can be less acidic than vinegar.
- Increasing the amount of water in a recipe can dilute the acidity to unsafe levels.
- The amount of salt in fermented pickles is very important and should not be decreased. Too little salt in pickling brine can cause spoilage.
- Adding meats, dairy, or fats alters the pH level of the food and will result in spoilage.
4. IT'S OKAY IF THE JAR DOESN'T SEAL
If for some reason a jar doesn't seal while processing in the boiling water bath, it's okay! You can still enjoy unsealed jars as long as you store them in the refrigerator. Just don't store those unsealed jars at room temperature with the other sealed jars.
With those canning fundamental rules in mind, let the canning bonanza begin! (Once you start, it can get really addictive. You have been warned.) Canning high-acid foods requires a process called boiling water bath, which consists of 10 easy steps:
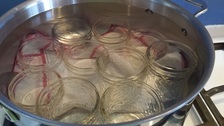
1. Place a kitchen towel on the bottom inside your large pot, and fill your large pot with water. Place your glass jars on top of the towel, and bring the pot to a boil. Make sure the glass jars are submerged in water so they properly sterilize. You can keep the water and jars boiling until you are ready to fill the jars with food.
2. Depending on what canning recipe you use, you'll need to cook your food for a certain amount of time before it's ready to fill the jars. The recipe should let you know how long. Food should be hot when going into the jars.
3. About ten minutes before you're ready to fill your jars with the hot food, turn off the stove and add the disc lids and screw bands into the water pot, making sure they are all submerged in the water.
4. When you're ready to fill the jars with food, carefully remove the hot jars from the pot. Use a ladle (and a funnel if you want) to fill the hot food into the empty jars.
5. When all the jars are filled, carefully wipe the rims of the jars to make sure there is no food where the jar and disc lid will touch. Food left on the rim may result in the jar not sealing properly.
6. Remove the disc lids from the hot water pot and place them on top of each jar. Then, remove the screw bands from the water both and firmly screw each band to secure the lid to the jar.

7. Place all the screwed jars back into the hot water pot, making sure the jars are complete submerged in water. Bring your pot back to a rolling boil.
8. Once the pot is boiling, let your screwed jars cook in the water for the amount of time your recipes specifies. This is called processing the jars.
9. Once the jars are cooked, carefully remove each jar from the pot with your jar lifter/tongs and place the cooked jars on a clean towel to cool. Cooling can take up to 12 hours. While the jars are cooling, you should hear the lids making a ping! sound, which means the jars have properly formed an air-tight seal.
10. All cooled jars should have their seals tested. A properly sealed jar will have the following:
There are TONS OF RECIPES out there for canning, and I plan to post some of my own soon. In the meantime, here are some great sites and books to get your canning mojo started:
8. Once the pot is boiling, let your screwed jars cook in the water for the amount of time your recipes specifies. This is called processing the jars.
9. Once the jars are cooked, carefully remove each jar from the pot with your jar lifter/tongs and place the cooked jars on a clean towel to cool. Cooling can take up to 12 hours. While the jars are cooling, you should hear the lids making a ping! sound, which means the jars have properly formed an air-tight seal.
10. All cooled jars should have their seals tested. A properly sealed jar will have the following:
- The lid should not have any give (i.e. pop up) when you press down on the center of the lid with your finger.
- At eye level, the lid should look concave (curved down slightly).
- Removing the screw band from the jar and very gently trying to pry the lid off the jar with your fingers will not work.
There are TONS OF RECIPES out there for canning, and I plan to post some of my own soon. In the meantime, here are some great sites and books to get your canning mojo started:
- www.foodinjars.com has ah-mazing sweet and savory canning recipes. The lady that writes this blog also published two books, "Food in Jars" and "Preserving by the Pint"
- www.sweetpreservation.com/ embraces the art of preserving fruit and has some really great stonefruit-based recipes - peaches, cherries, apricots, plums, etc.
- "Tart and Sweet" by Kelly Gearing and Jessie Knadler is a book that has some nice, modern recipes both canning and pickling.
- "Canning for a New Generation" by Liana Krisshoff also has some ver cool modern recipes. It's definitely not your grandma's canning!
